 USB turntables are great for converting vinyl to MP3. Many of them include Audacity as a recording tool. I have read many reviews of people complaining about Audacity being too complicated.
I’m writing this guide to help those that have trouble using Audacity. I’ll take you, step by step, through the process of digitizing your vinyl records. By the end of this tutorial, you will be able to convert vinyl to MP3 or other digital formats like WAV or AAC. Once your music is digitized you can transfer you vinyl music to a CD if you so desire. Audacity is really not that hard to use as you will see in this tutorial.
A little disclaimer before continuing. I’m writing this tutorial in good faith and with the intention to help people. However, I take no responsibility for, and will not be liable for any damage, loss of information or anything related to use and implementation of this tutorial.
I will be using the Audio Technica AT-LP60-USB turntable because it’s a very popular turntable and I own one. This article may also help you decide if the AT-LP60-USB is a good choice for digitizing your vinyl collection. You can use any turntable for this purpose. I will use the USB connection, but you can connect your record player directly to the sound card if it doesn’t have a USB port. I think that’s even easier.
Other USB turntables you may want to consider for digitizing your LPs with Audacity are the following:
What you need for this tutorial
- A turntable with or without USB port. I will be using the Audio Technica AT-LP60-USB.
- The vinyl record you want to digitize
- Computer with USB port or auxiliary inputs
- Latest copy of Audacity. At the time of writing, the latest version is 2.1.2
- You need a pair of speakers or headphones in order to monitor your recording. Your computer speakers are fine.
- I highly advice you to clean your records before recording. You will be amazed by how much the sound quality improves. By cleaning your albums before recording, you may not even need to go through the process of removing noise and clicks.
Installing Audacity
If you haven’t done it already, the first step is to install Audacity. If you bought a USB turntable that includes a CD with Audacity, don’t use it, as it’s most likely outdated. Instead, we are going to download the latest version from the official website. If you have already installed Audacity, skip to the next section. I’ll try to avoid giving you too much detail because I think the installation process is very easy. If you ever need help, just leave a comment below the article.
Audacity runs on Windows, Mac OSX and Linux. There are a few differences between computers but the process is essentially the same. I will be using Windows 10 for this tutorial. Please be aware that images and processes may be different for your.
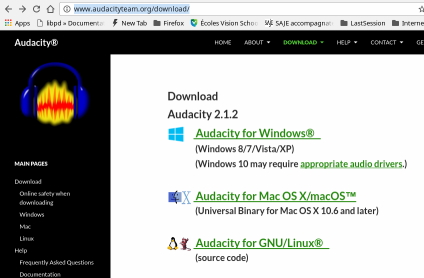
- Click here to donwload the latest version of Audacity and follow the instructions. It should be straight forward.
- Chose your platform.
- For Windows -> Click Audacity for Windows. I would download the Audacity 2.1.2 installer
- For Mac -> Click Audacity for Mac OSx. I would download the Audacity 2.1.2 .dmg file
- For Linux -> I suggest you download it from your distribution’s repository
- Open the installation file and follow instructions. If you get a warning message complaining that the file comes from an unknown publisher, don’t worry, go ahead and install the software.
Connect the AT-LP60-USB to the computer
You can either connect your Audio-Technica AT-LP60 USB to the computer via the USB port, or directly to your computer’s sound card using the RCA to 3.5 mm jack adapter. In this tutorial I’m going to be using the USB connection. If you don’t have a USB turntable just skip to the recording section of this tutorial.
If you have a Windows computer, just connect the cable to the USB port. Your computer should automatically detect the turntable and start installing the USB Audio Codec drivers. Make sure you are connected to the internet so the the computer can download the required drivers. You should get a dialog similar to the following.

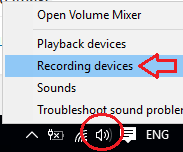
Now, we are going to make sure that the USB Audio Controller is working properly. First, right click on the speaker icon at he bottom right corner of your computer screen and select Recording Devices.
You’ll see your USB Audio CODEC device listed under Microphones. Don’t expect to see the name or brand of your turntable. Look for USB Audio CODEC. If the device is working properly, you should see a green check mark.
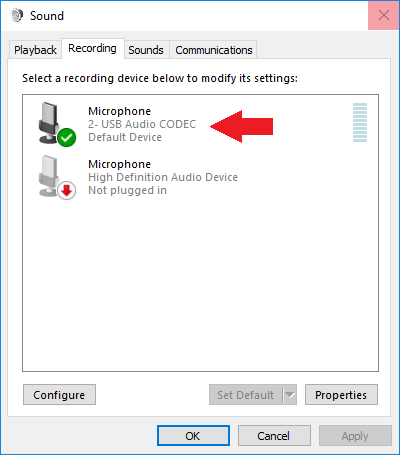
Now we can test if the sound of your turntable is coming through. You can use this little trick also if you want to listen to your turntable through your computer speakers. Double click the microphone icon from the recording tab, the one with the green check on it. Click on the Listen tab and check the Listen to this device checkbox. Finally click the OK button.
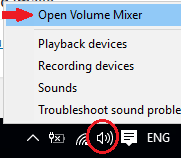
At this point, you should be able to listen to your turntable. So, go a head and play your favorite album. If you want to adjust the volume of your turntable, open the mixer by right clicking the speaker icon as before and select the Open Volume Mixer option.
Now you can adjust the volume coming from your turntable via the USB cable. Nice! isn’t it! 🙂
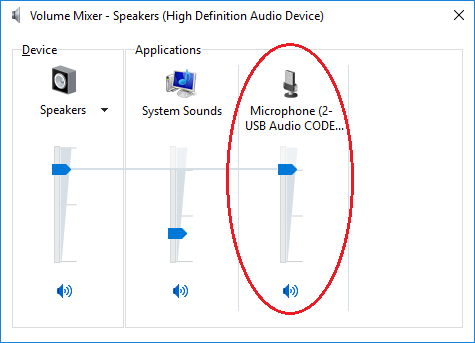
We performed the above procedure just to make sure that everything works just fine. However, I don’t recommend enabling playback when recording, because you are going to enable this feature inside Audacity. Now that you know your device works, you can uncheck the Listen to this device option.
Audacity preferences
Before we start recording, let’s make sure we have everything setup correctly. First, make sure to close all other programs, you don’t want anything to happen in the middle of your recording. Your computer’s ability to multitask is not very good when recording audio. Some processes may cause unwanted clicks or interruptions on your audio streaming. Unless you have a powerful computer, I would refrain from surfing the web while digitizing your music.
Enable playthrough
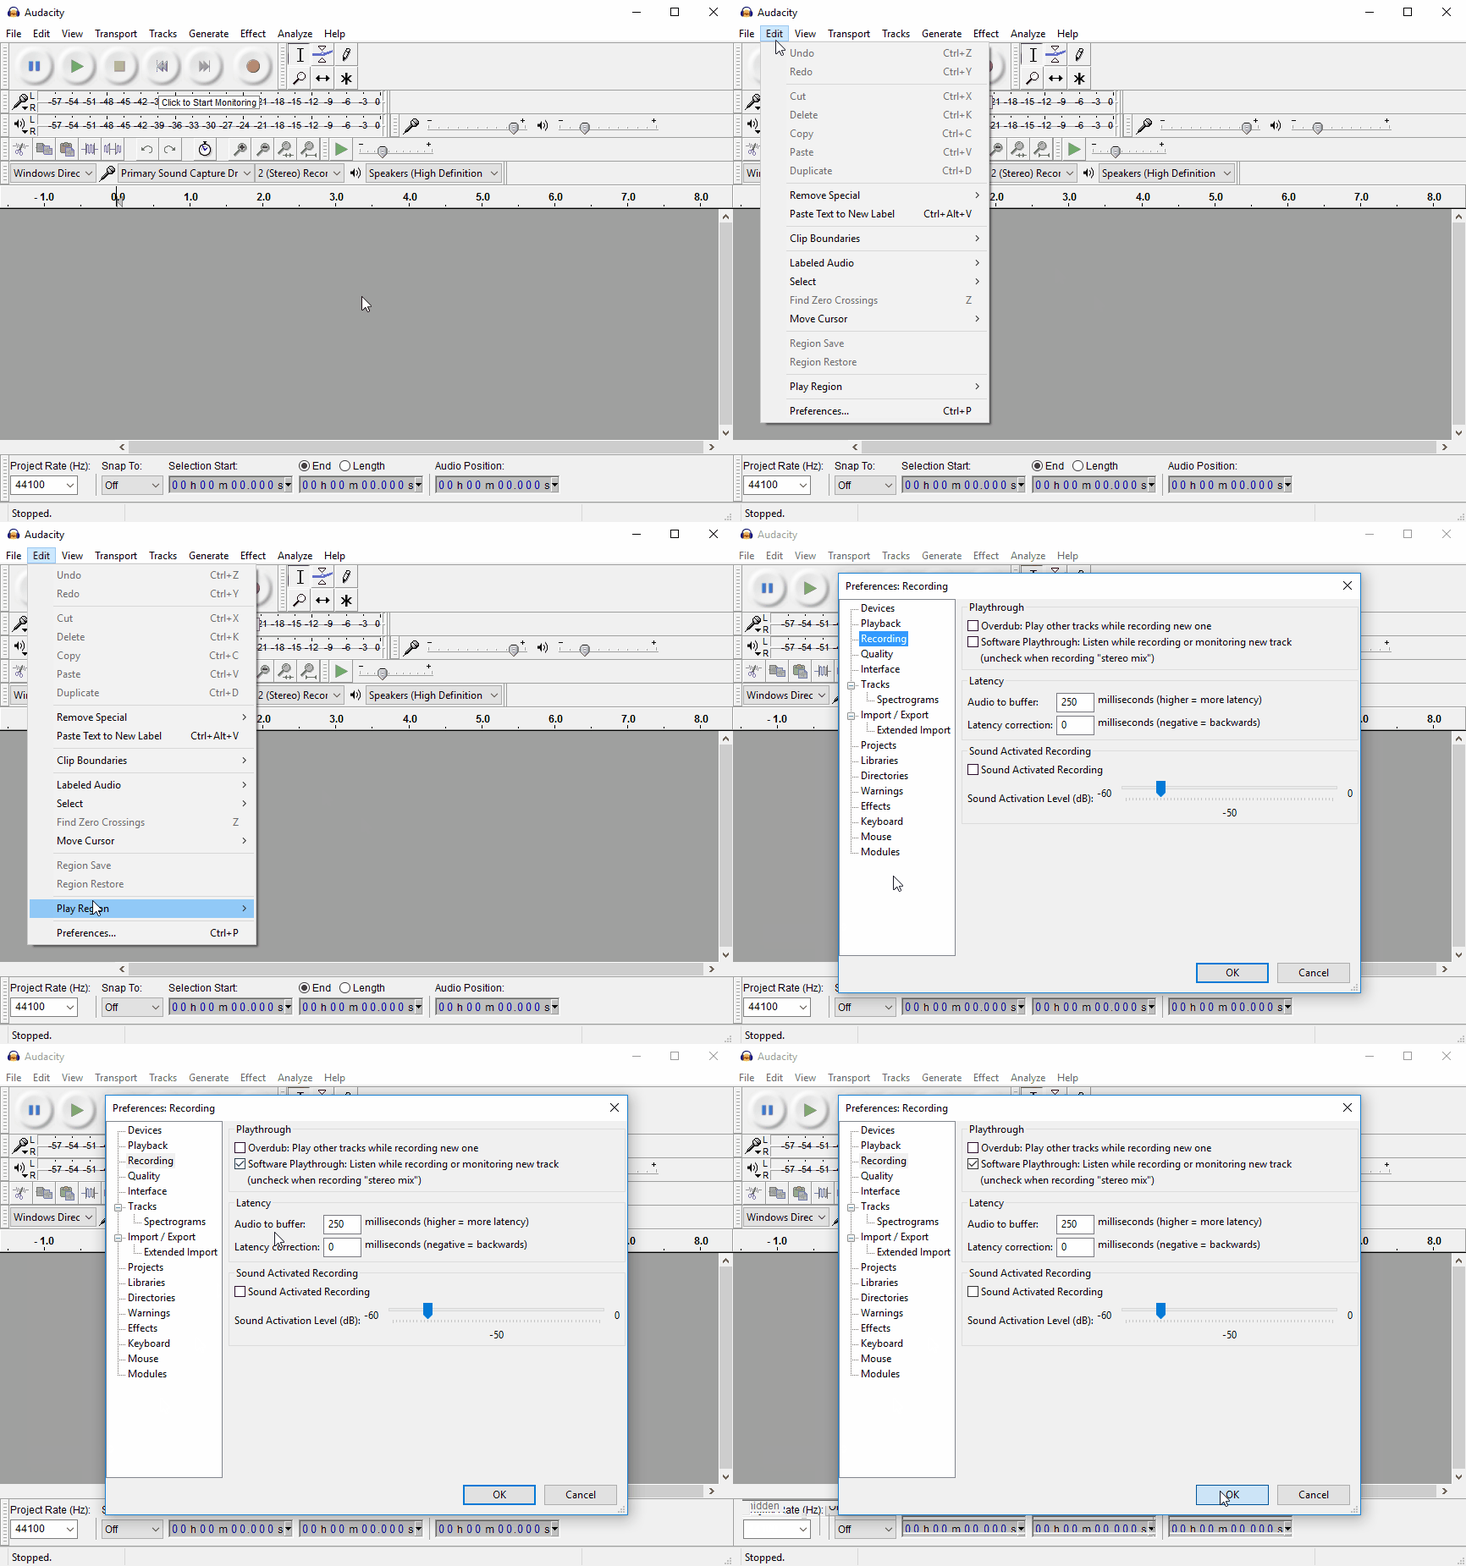
In order to monitor playback while recording, we need to enable playthrough inside Audacity.
- Start Audacity
- Open the preferences dialog by going to Edit -> Preferences.
- Then, click Recording on the left.
- Enable playthrough by clicking on the Software Playthrough checkbox and click OK.
Selecting the USB Audio CODEC device
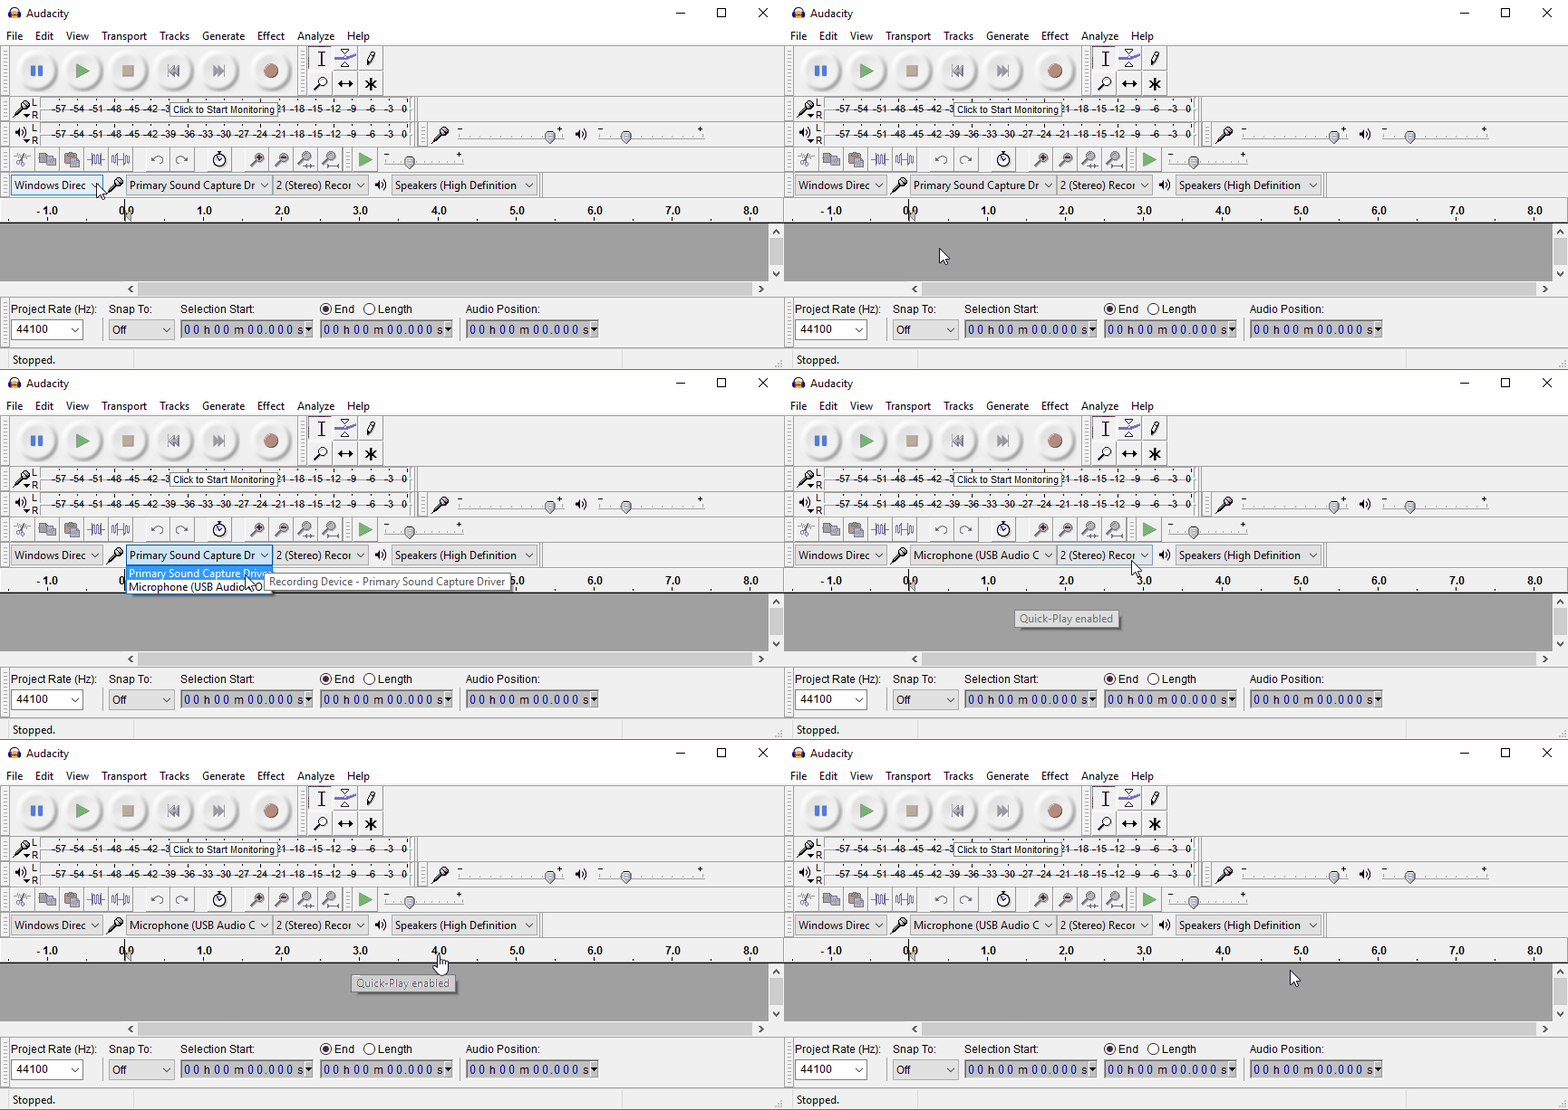
From the Device Toolbar, make the following selections:
- Audio host. You have 3 options: MME, Windows Direct Sound and WASAPI. Any will do. If you have an old computer select MME, otherwise select Windows Direct Sound. Click here if you want to know the difference between the three audio hosts.
- Recording device. Look for the microphone icon. Select USB Audio CODEC from the drop-down menu.
- Number of channels. Select stereo, unless you have a mono vinyl record.
- Playback device. I would choose the speakers. Make sure you don’t choose the USB Audio CODEC here.
Play your vinyl music and adjust input volume
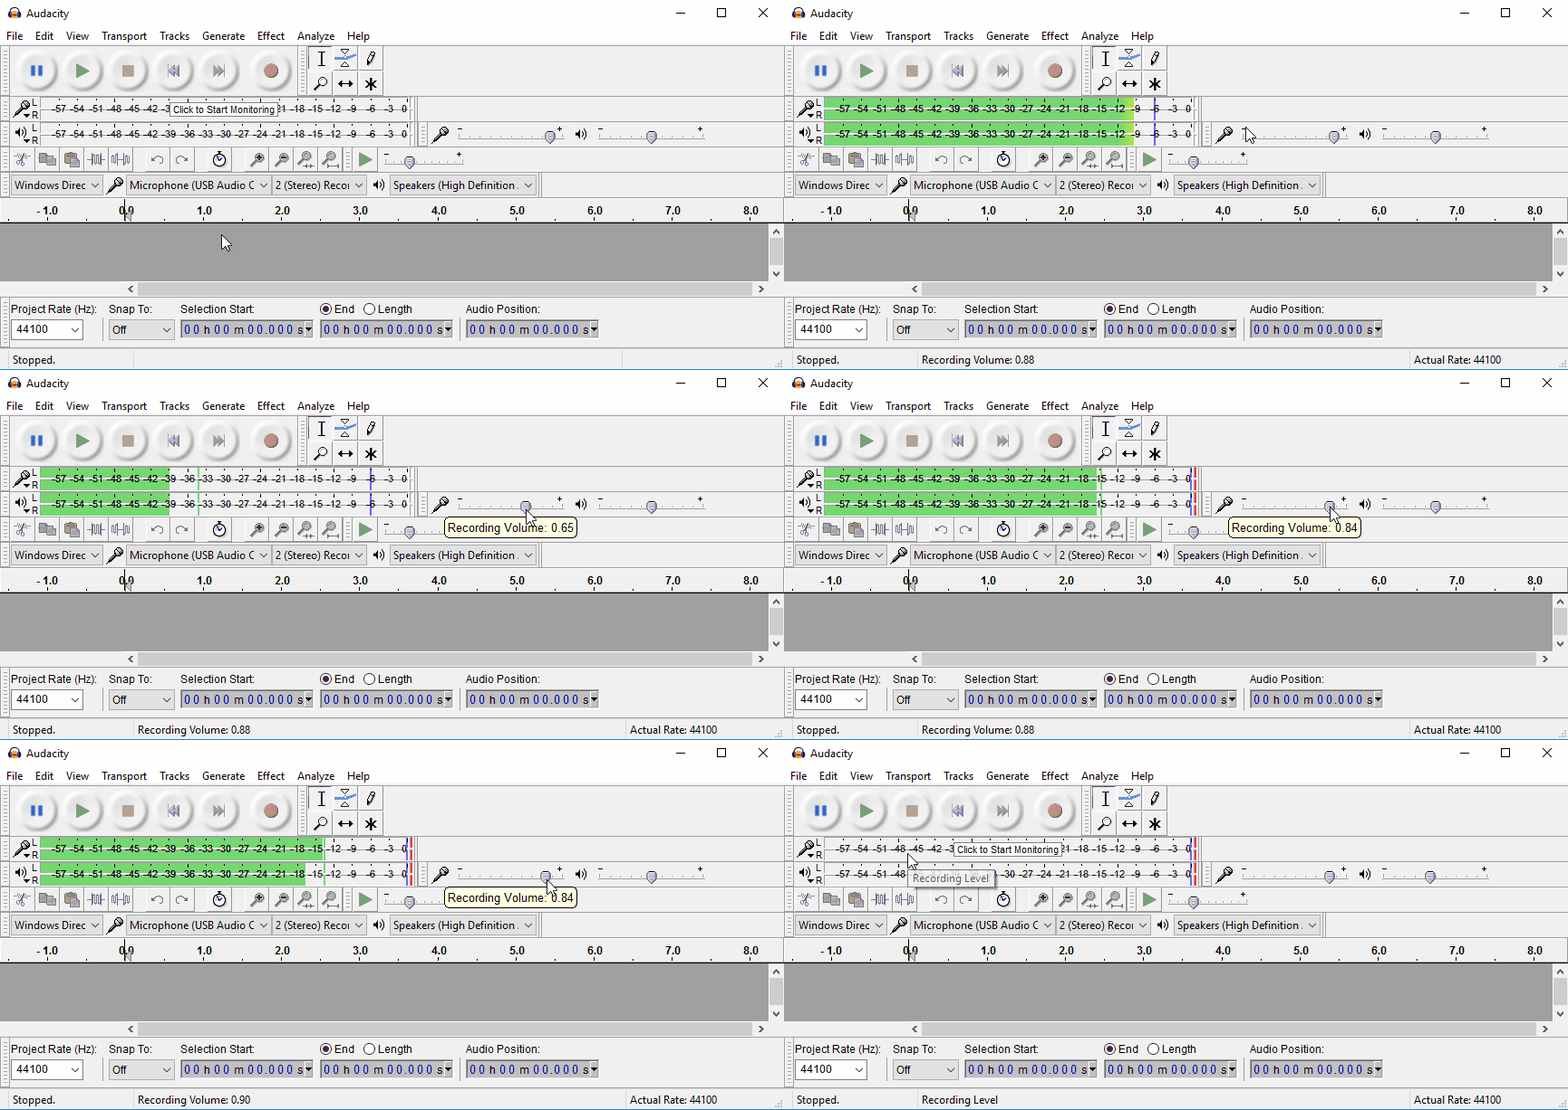
Click the recording meter to start monitoring sound coming in from your turntable. Press the start button on your AT-LP60 USB turntable to start playing some music. You’ll see a green bar moving. Adjust the input level by moving the slider with the microphone icon.
Use the loudest passages of music as a reference. Make sure the bar doesn’t get all the way to the right. If the bar turns yellow or red, it means that your recording volume is too loud and you may get clippings on your recording. This will cause undesired effects. My recommendation is to keep the bar green.
You can also adjust the volume coming out of your speakers by moving the slider with the loudspeaker icon. Adjusting the output volume won’t affect the volume of your recording.
Recording
When recording, make sure you capture some background noise form the beginning of the record. We’ll use the noise sample for noise reduction later on. Don’t worry, we are going to edit and trim the recording later.
To start the recording just press the red button. A new track will be created. If you selected stereo from the device toolbar, you’ll see two channels. Now start playback on your turntable. You can either record several songs at once and then split the songs, or record one song at a time. The former is faster, but it’s more prone to errors.
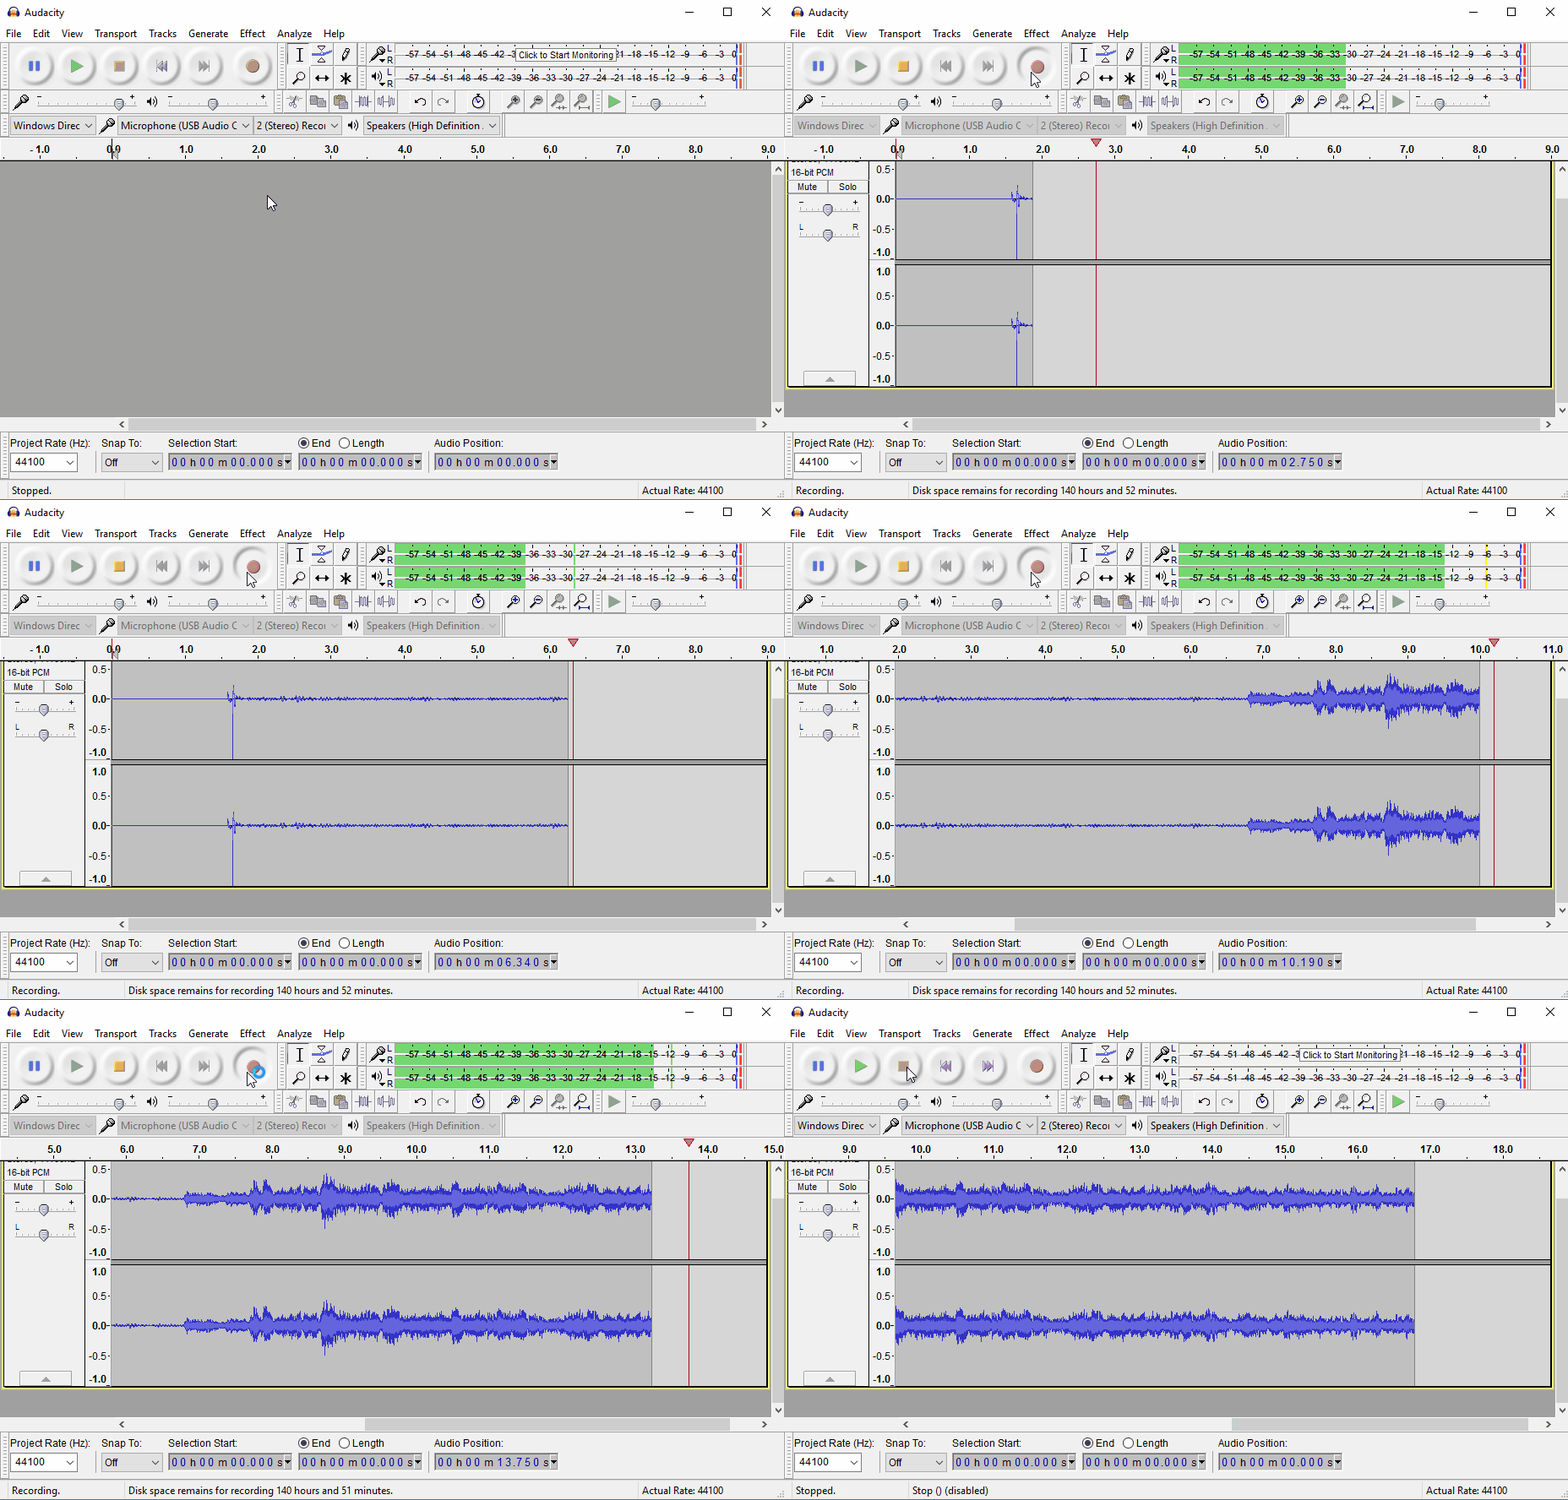
When your song has finished playing, stop the recording by pressing the yellow square button. You should have two tracks recorded. If everything went well, you should see two blue waveforms representing the audio you just recorded. You can listen to the recording you just made by pressing the play button (green triangle).
Noise reduction
If you want to remove background noise, now it’s the time, because we have not edited the recording yet and there’s still noise at the beginning of the recording. If you don’t want to remove noise from your recording, you may skip to the next section.
Noise removal is a two step process:
- Get a noise sample.
- Remove noise from recording. Audacity uses the spectral characteristics of the noise sample taken before to remove noise from the entire audio signal.
Let’s now see how it’s done with Audacity.
- Select the noise part at the beginning of the song. Using the selection tool drag the area where you will get your noise sample from. You may need to use the zooming tools.
- Then go to Effects -> Noise Reduction
- Click on the Get Noise Profile button.
- Select the entire track (Ctrl + A)
- Go to Effects -> Noise Reduction. This time go to step 2, adjust parameters or leave the default ones and click OK.
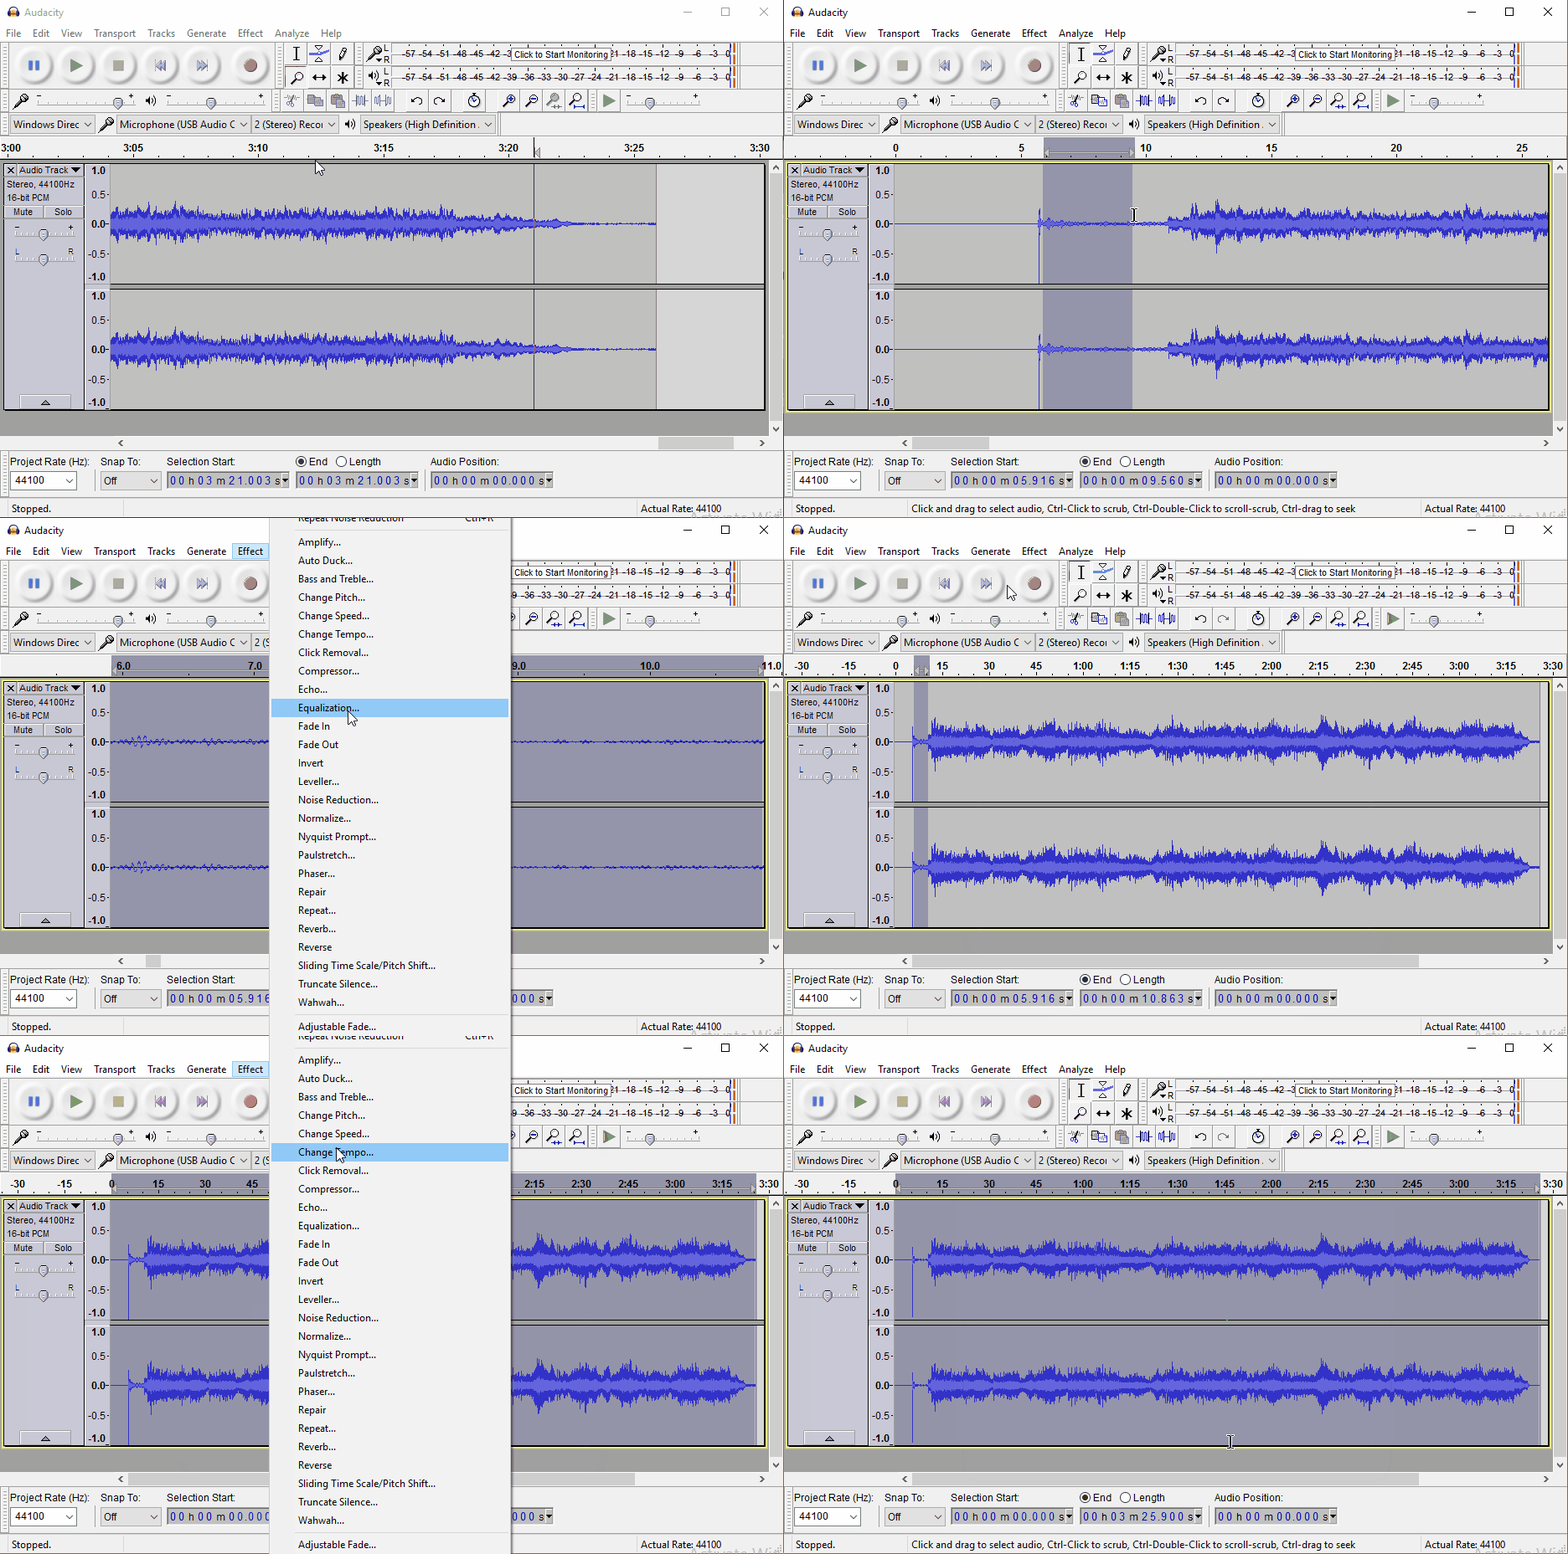
You can adjust the parameters of the noise removal tool. I find that the default values work well for me. Just remember that if you apply to much noise reduction, your recording may damage the remaining audio. For example, if I increase noise reduction and level sensitivity too much, the resulting audio sounds like it’s playing inside a container or a sewage pipe. Click the link to find more information about noise reduction with audacity.
Click and Pop removal
With Audacity it is also possible to remove clicks and pops. This feature works well for the most part, but don’t expect all clicks and pops to be removed. Those remaining clicks and pops may be removed individually, however, it is a time consuming process. You can adjust the sensitivity of the click removing tool. Just be careful because too much sensitivity may damage the resulting audio.
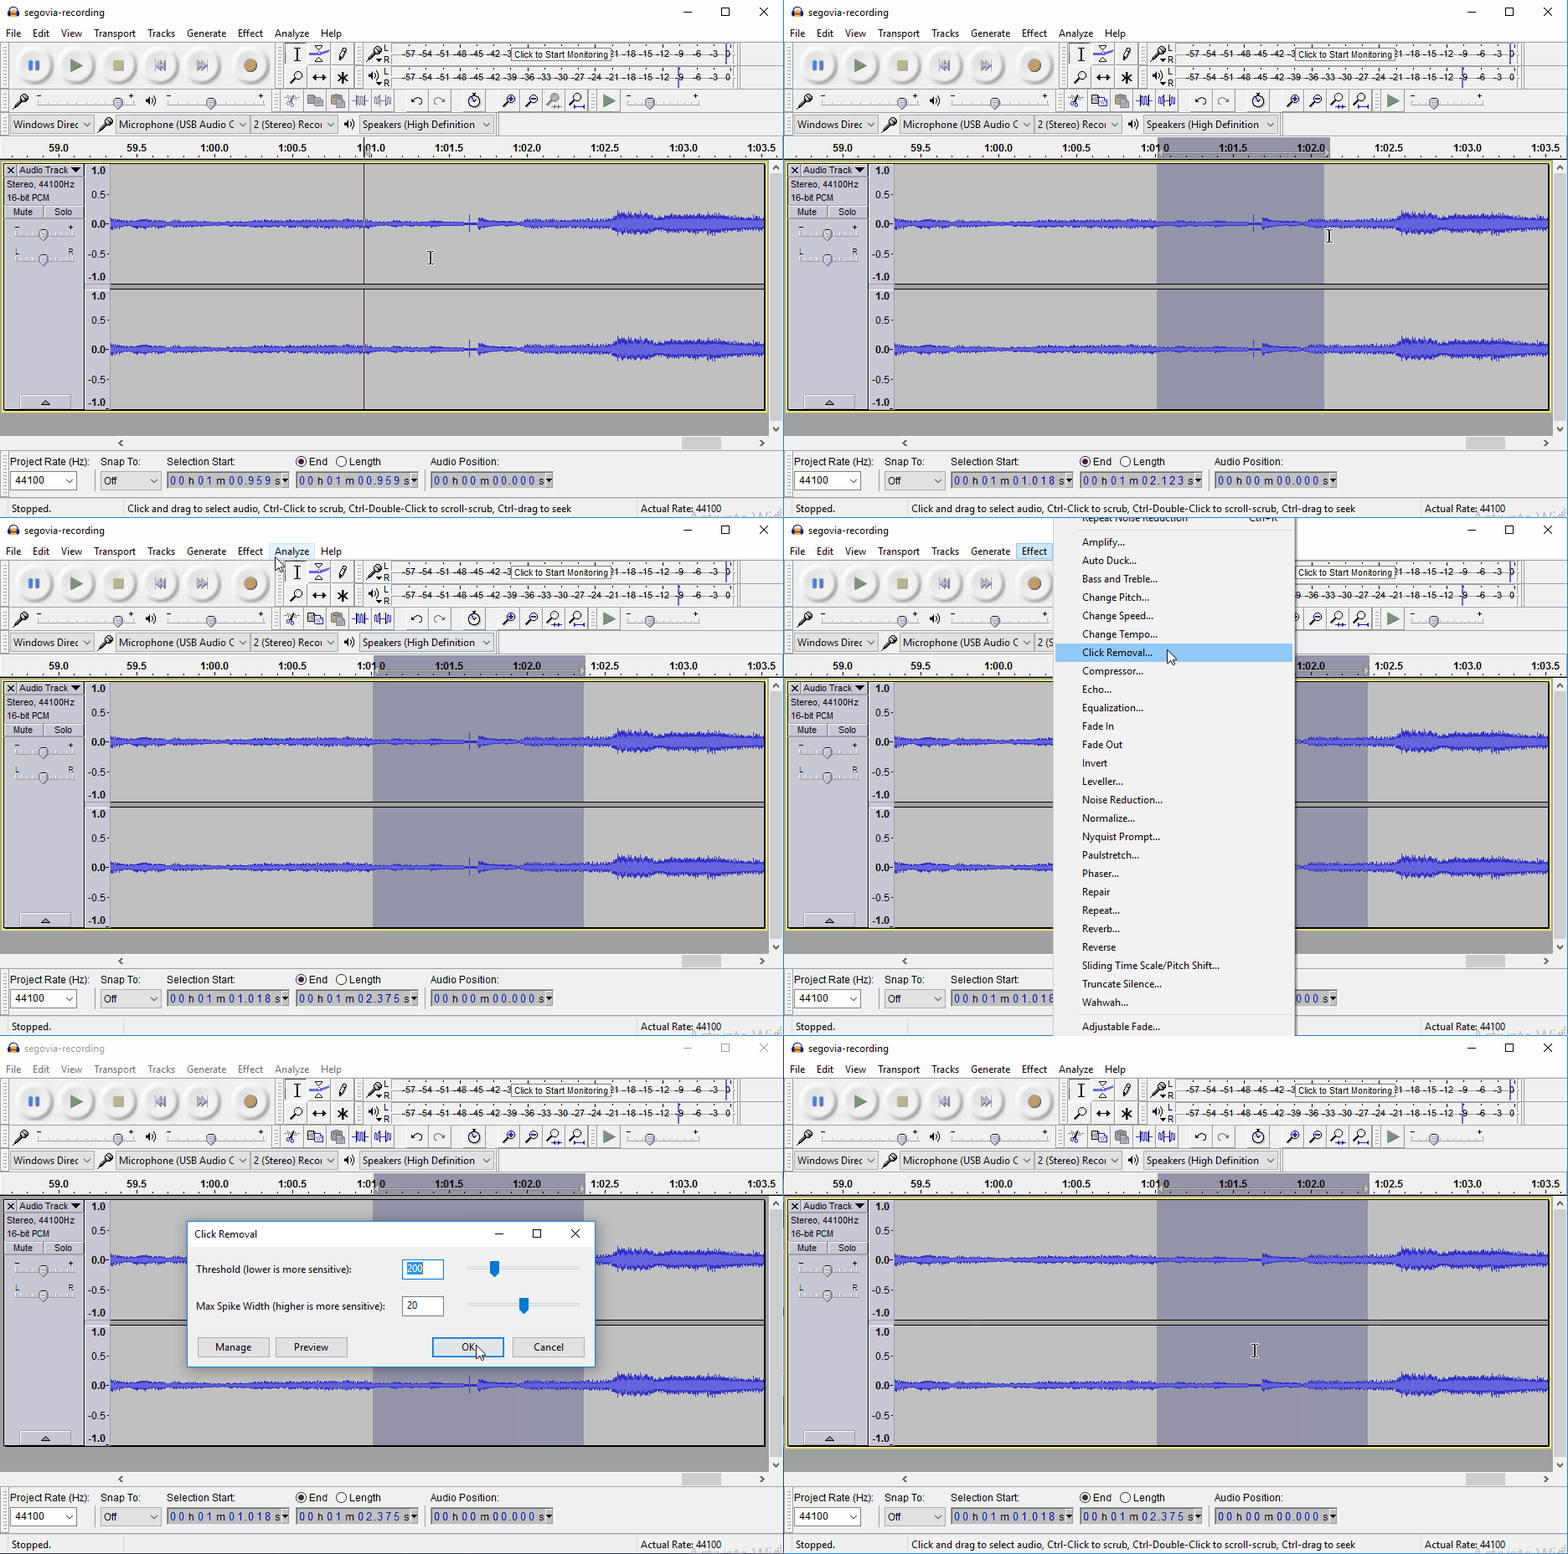
- Locate the section of music containing the pops and clicks. You may select the entire audio (ctrl + a) if you wish.
- Go to Effects -> Click Removal. Adjust the parameters or leave the default values and click OK.
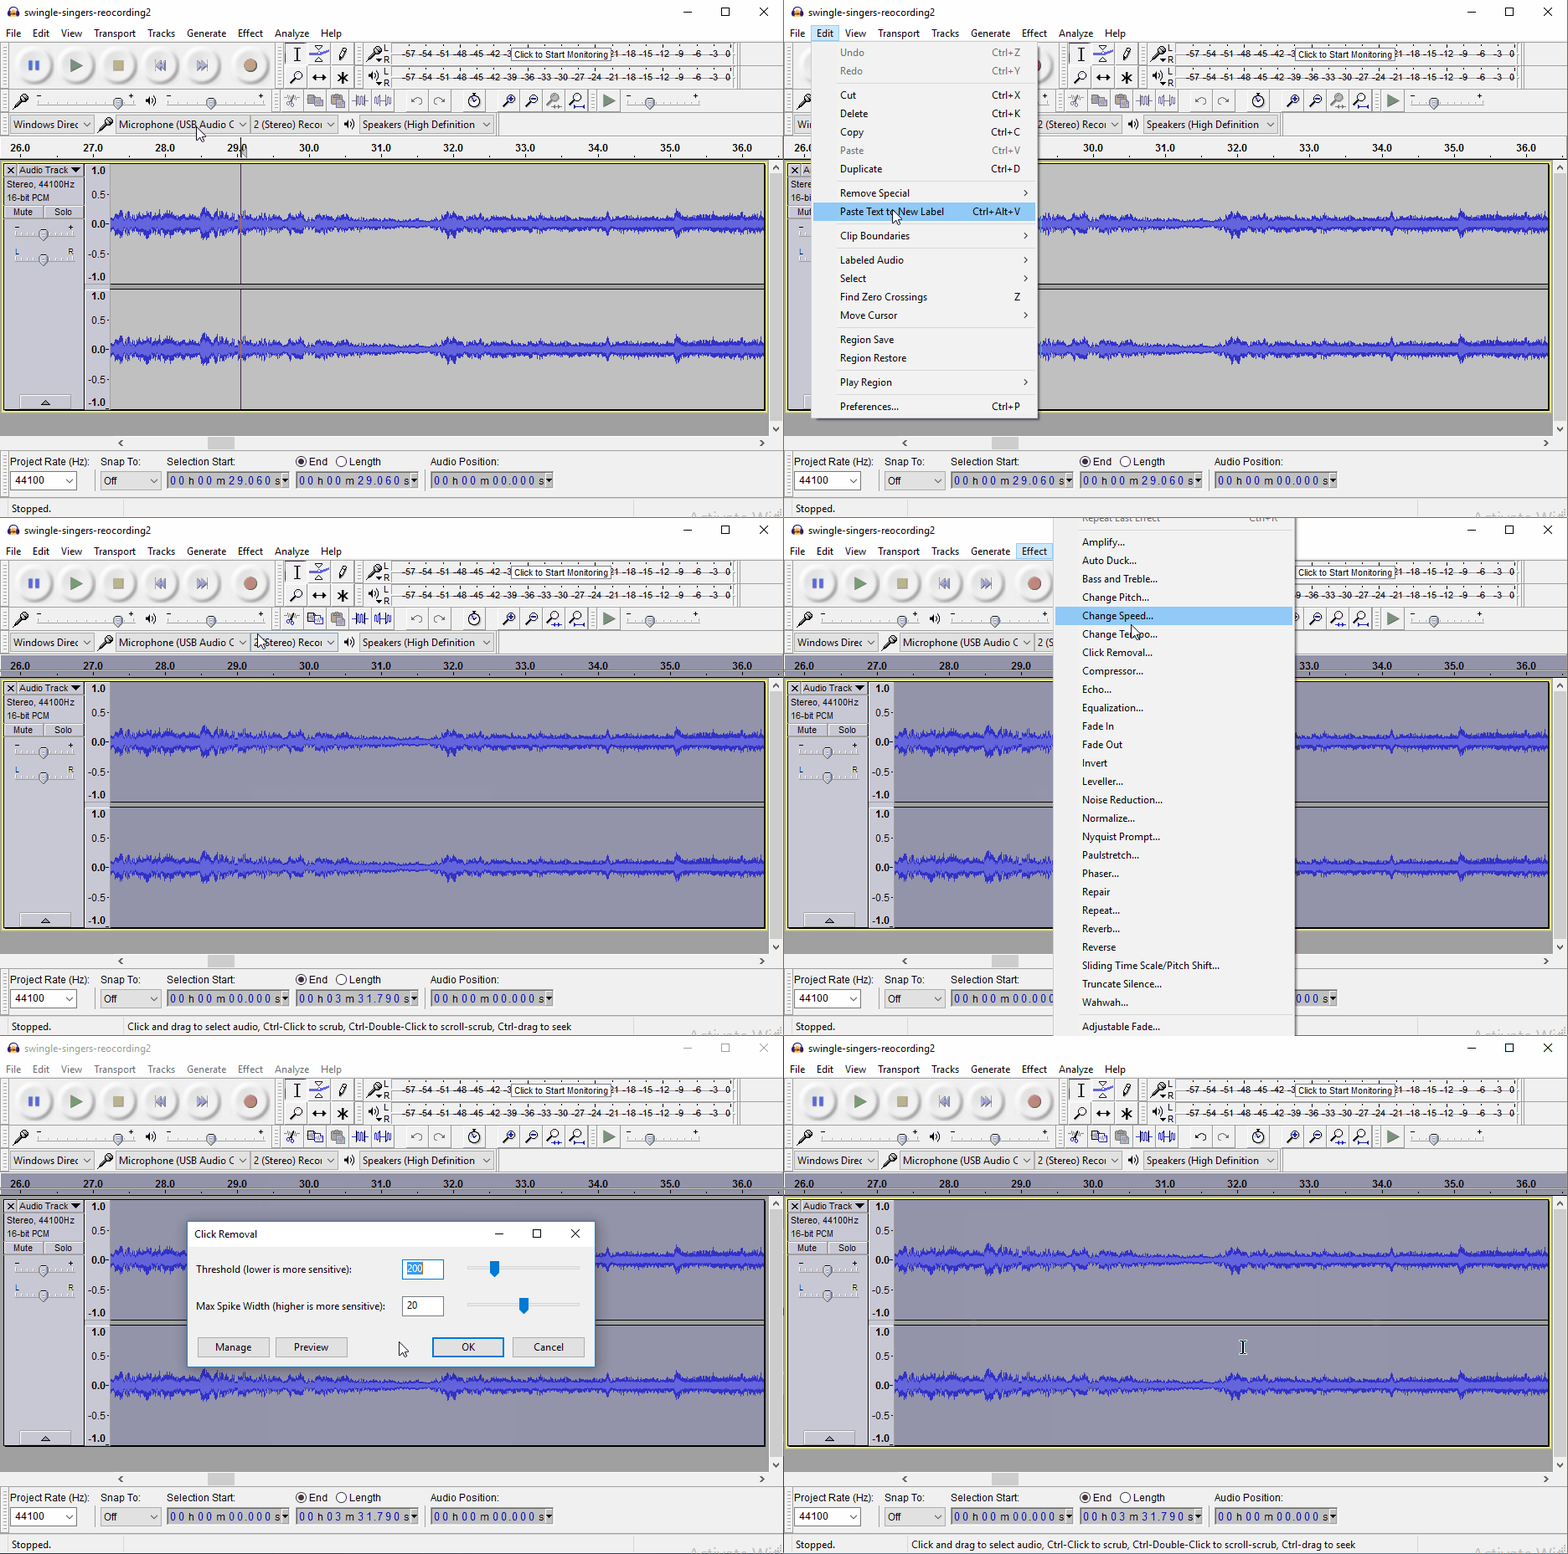
Some times, it works better to select individual clicks or shorter sections of audio, this will allow you to set different parameters for the click removal tool. As I said before, this can be labor intensive. This is why I recommend cleaning your records before recording.
Using the repair tool for individual clicks and pops
Some times, when the click remover tool doesn’t work, you can remove individual clicks using the repair tool.
- First locate the annoying pop or click.
- Zoom in until you can see individual samples.
- Select a small region around the click you want to remove. You can select up to 128 samples
- Go to the menu bar and select Effects -> Repair.
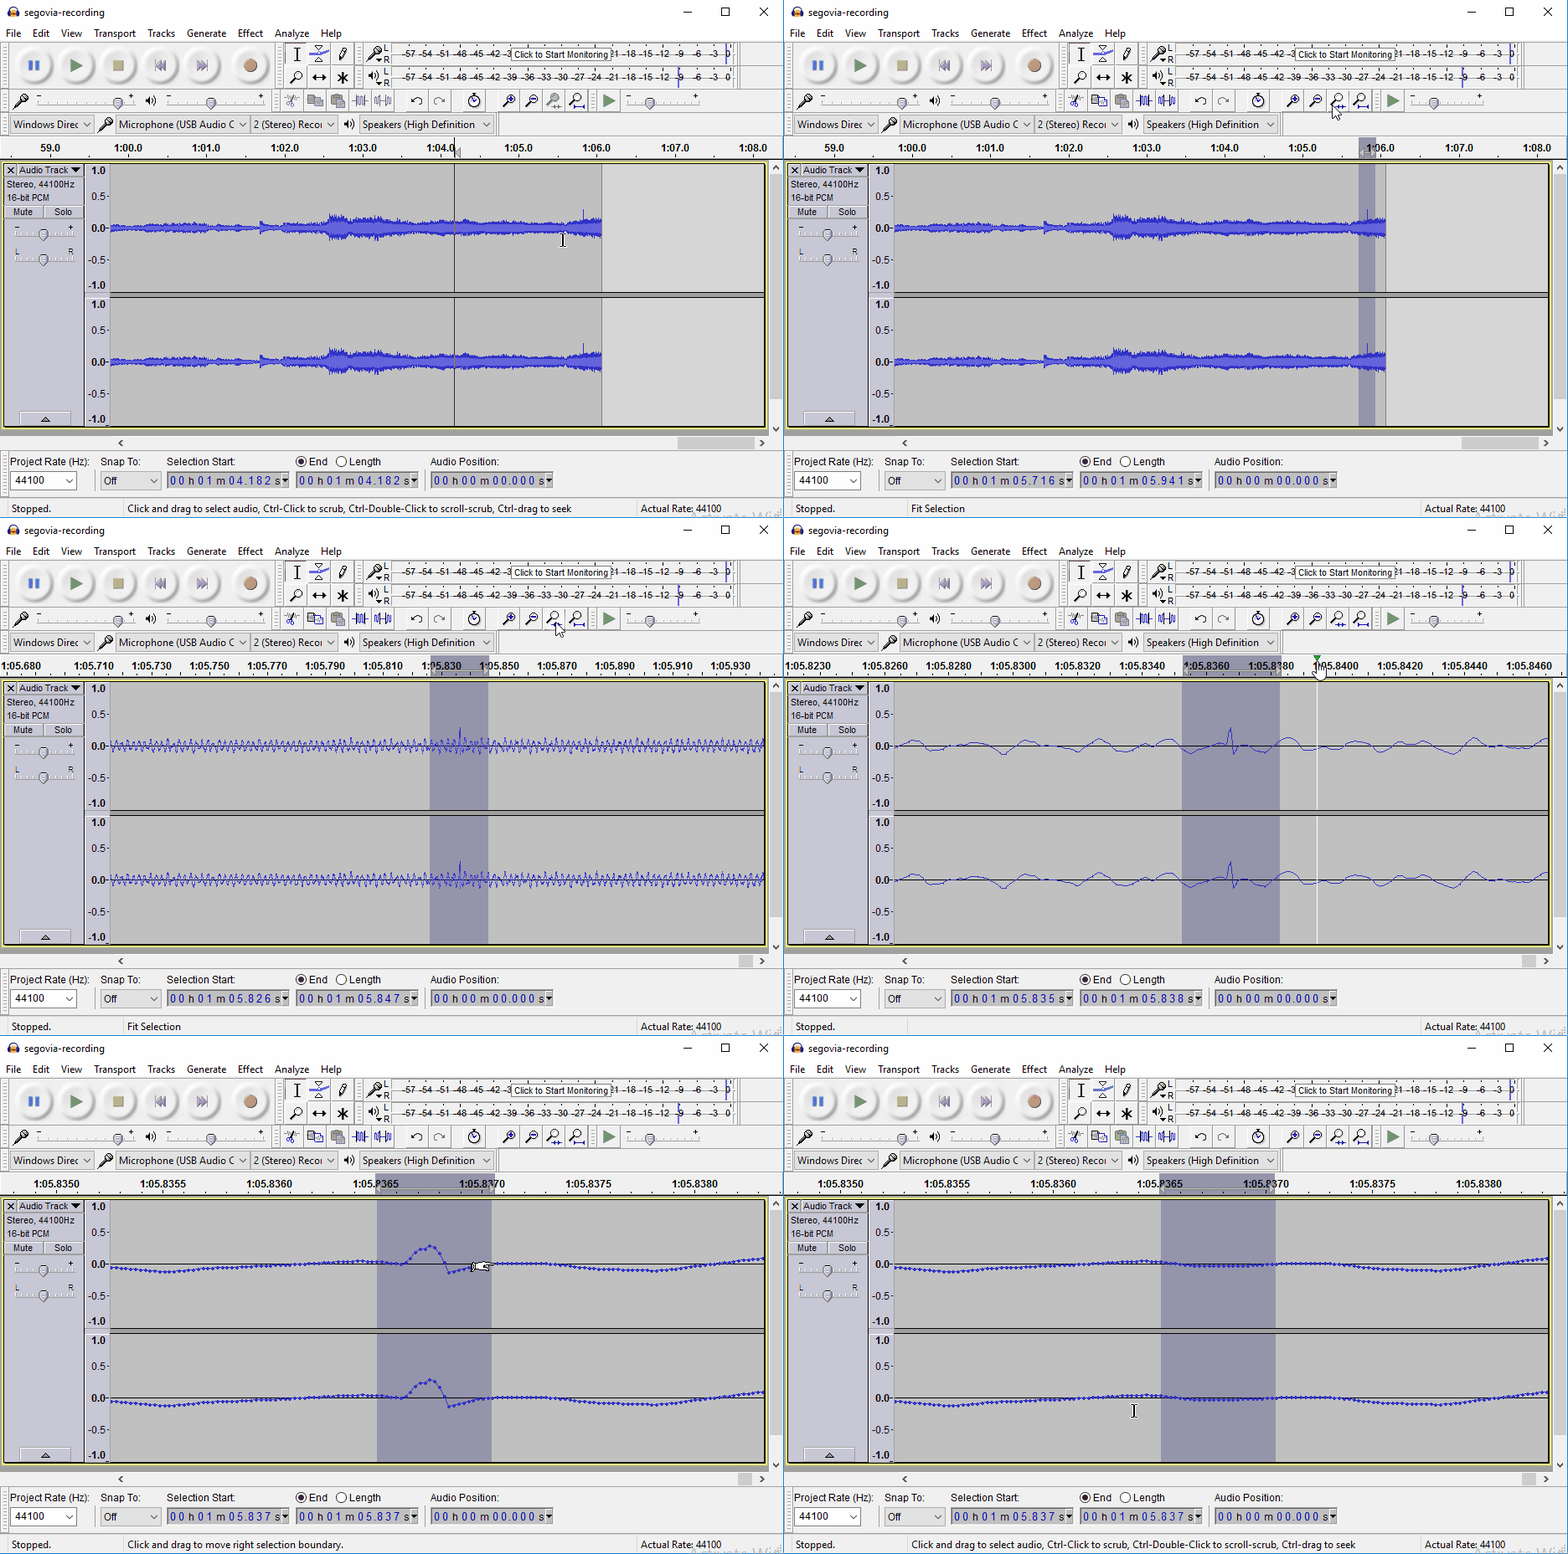
Click this link, for more information about removing clicks and pops.
Editing and finishing your recording
We are almost done. A few finishing touches are needed before we can export our work. We’ll trim the audio signal, apply fade in to the beginning and fade out to the end of the track.
Trimming the audio signal
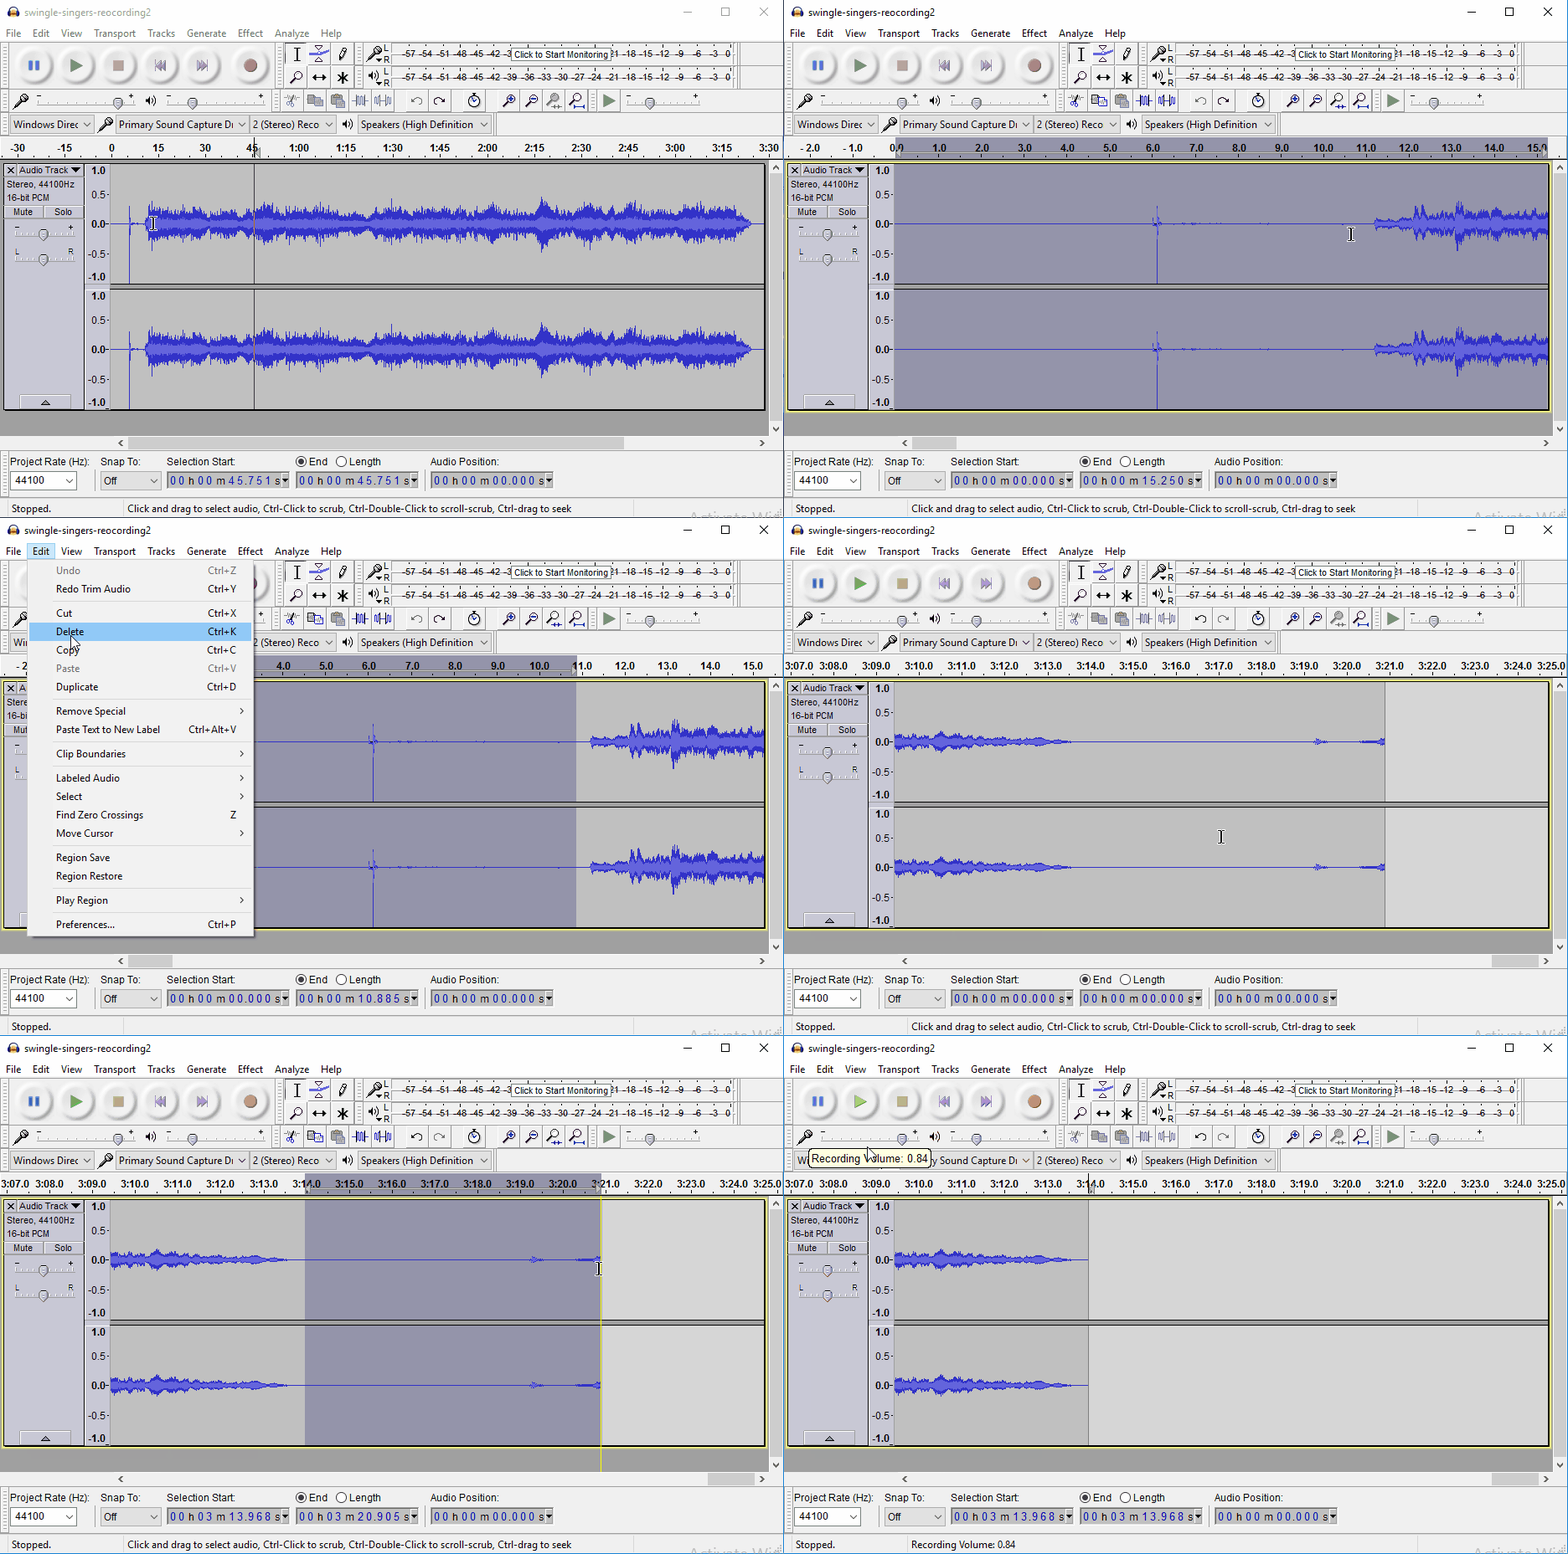
- Select the beginning and end of your song using the selection tool. You can select an area of the audio signal by dragging, but the way I do it is as follows: click the waveform where you want the selection to begin. Hold the SHIFT key while you click the waveform at the spot where you want the selection to end. You may need to use the zooming tools to make it easier to find your spots. Make sure to leave about one second on each end.
- Press the Trim Audio button.
- With the Trim Shift Tool, move the trimmed audio signal all the way to the left, or where you want your finished track to start.
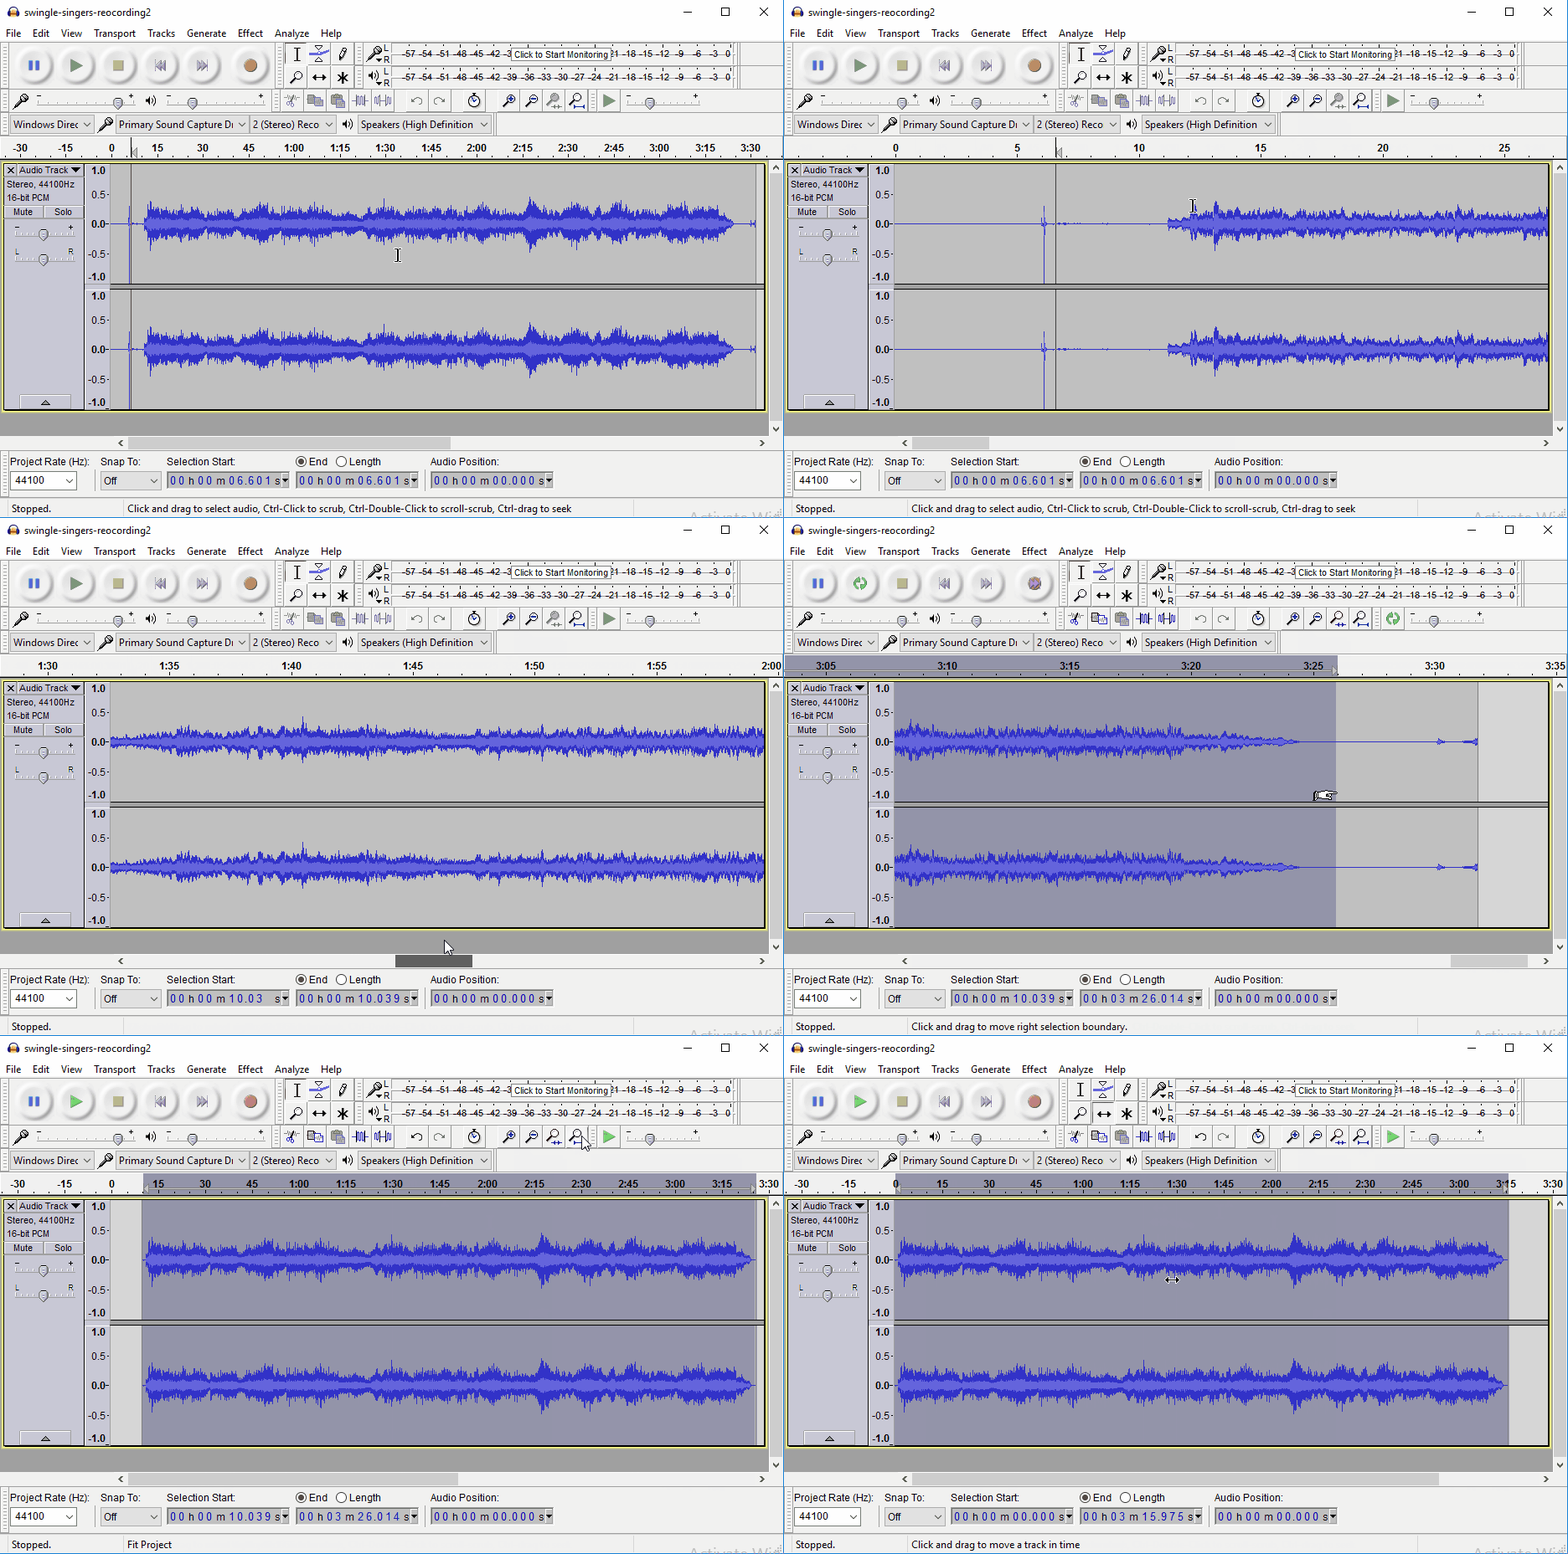
Another way to trim the signal is by deleting the parts of the audio signal that you don’t want. You achieve this by selecting an area and pressing the delete button on your keyboard.
Apply fade in and fade out
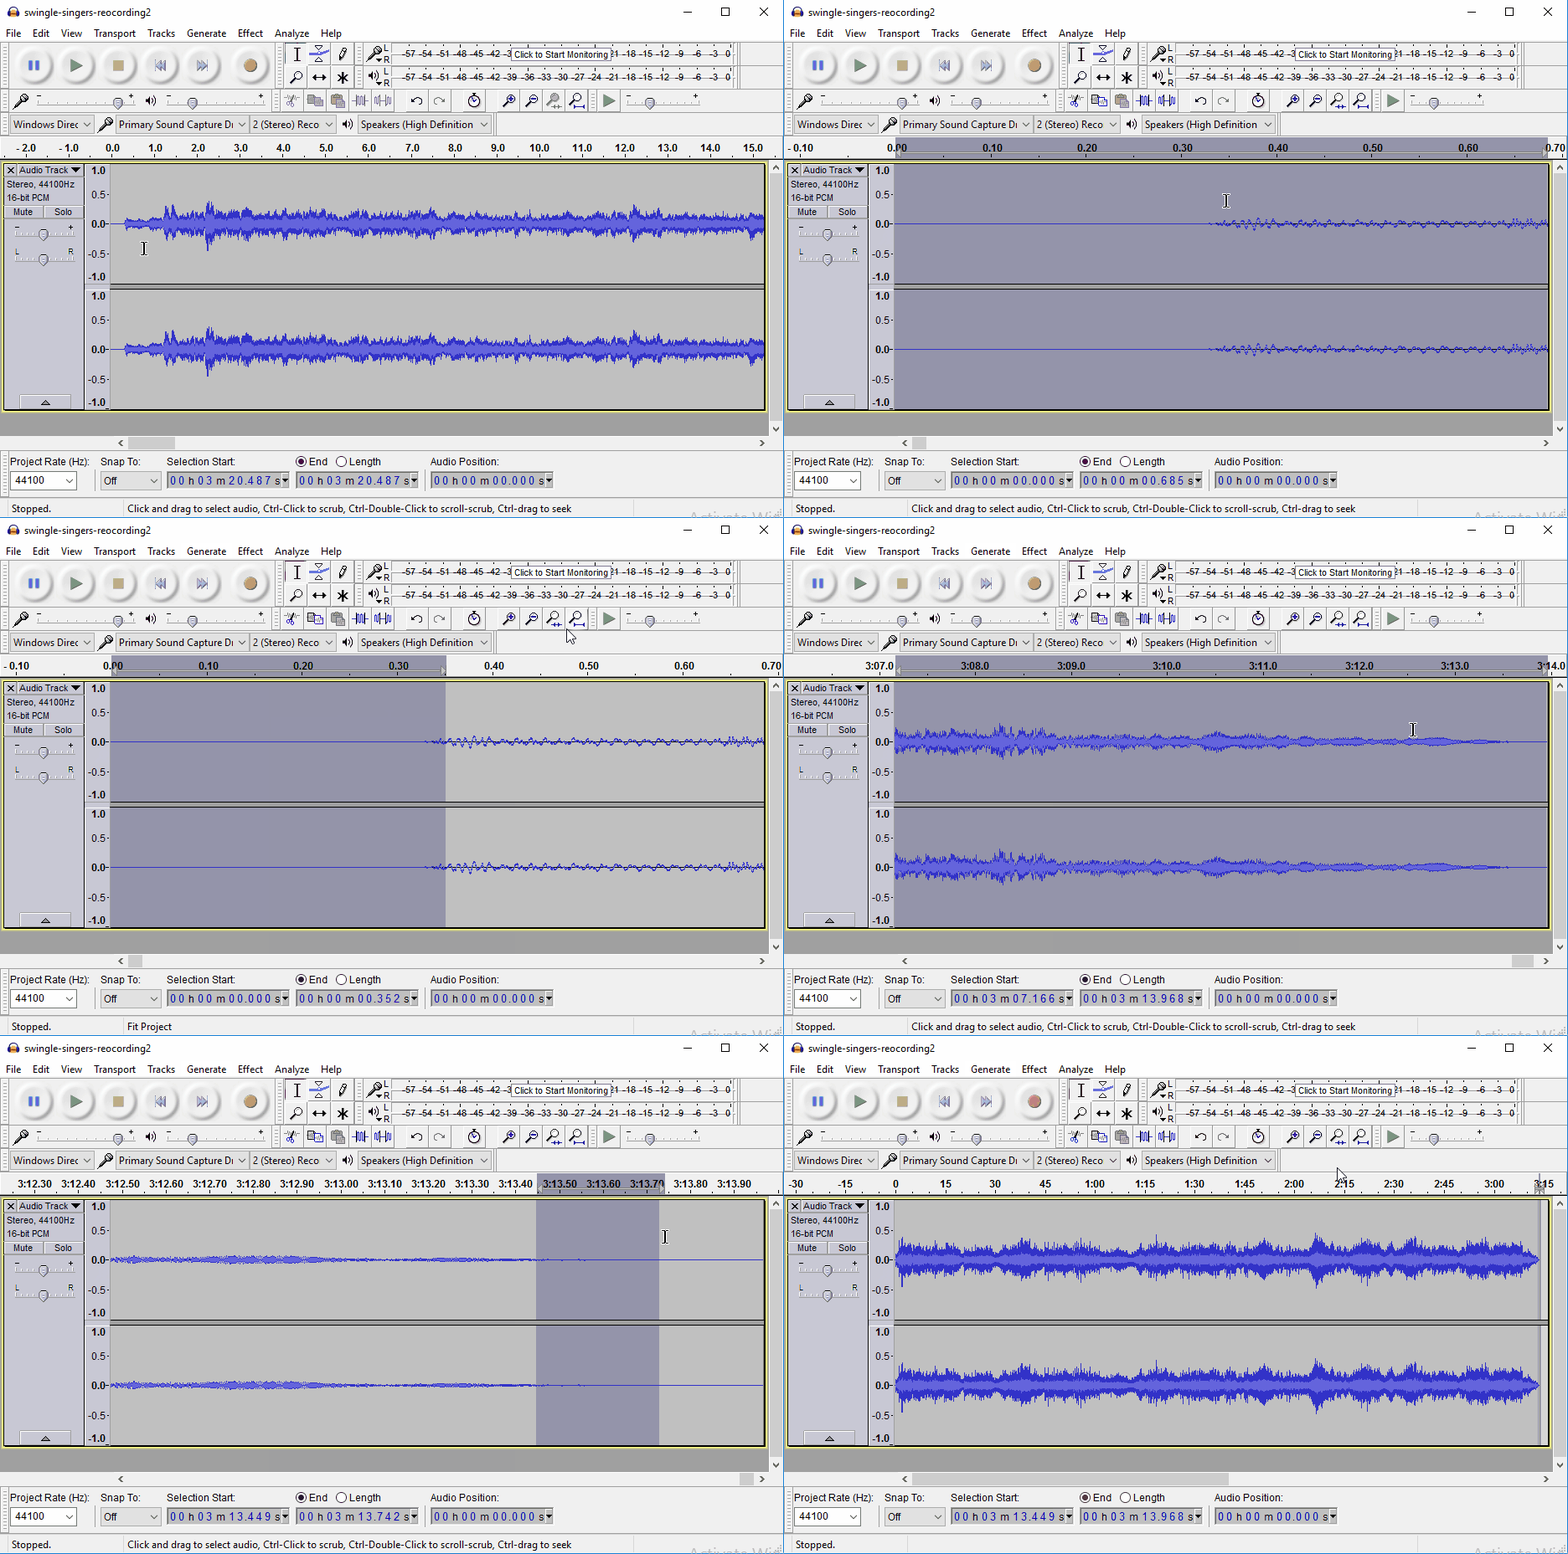
It is a good idea to always apply a fade in at the beginning and a fade out at the end of the song. This is because there is background noise before the song starts and you need to smooth the start and end of the playback.
- Select a short segment before the beginning of the song. You may need to use the zooming tools.
- From the Effects menu select Fade In.
- Select a small segment at the end of the song.
- From the Effects menu select Fade Out.
Export your digitized vinyl to MP3, AAC or WAV
Your song is digitized and ready to be exported. You may want to save the audacity project as well, in case you want to modify it in the future. Just remember that audio files are large. So, if you don’t plan to edit the audio file in the future, don’t waste your hard-rive space. To save your work as an Audacity project go to the File menu and select Save Project or Save Project As.
Now the best part, let’s export the song. First, you need to decide what format you want. The table below gives you a few suggestions. Just remember that MP3 and AAC.
| You want to: | Recommended format |
|---|---|
| Burn an audio CD | WAV (Microsoft) signed 16-bit PCM |
| Play on mobile device s | MP3 |
| Play on an Apple device, like iPhone, iTunes, Mac, etc | M4A (AAC) |
The procedure for exporting is straight forward, except that the program will ask you about the quality of the format. I would go with the default settings. Later you can experiment with them.
Important: In order to export MP3 and AAC files, you neede to install the LAME MP3 ecoder on your computer. At the time of writing this tutorial, you can download the encoder from buanzo.org. If you don’t want to install the encoder, you would have to export your song to a WAV file and then convert it to MP3 or ACC with another tool.
Install the LAME MP3 ecoder and ffmpeg as follows:
- Go to buanzo.org
- Download and install the Installer Package for Windows: Lame_v3.99.3_for_Windows.exe (version at the time of writing thist tutorial)
- Download and install FFmpeg Binary for Windows: ffmpeg-win-2.2.2.exe (version at the time of writing thist tutorial)
You can also follow the installation instruction from Audacity.
Exporting your work
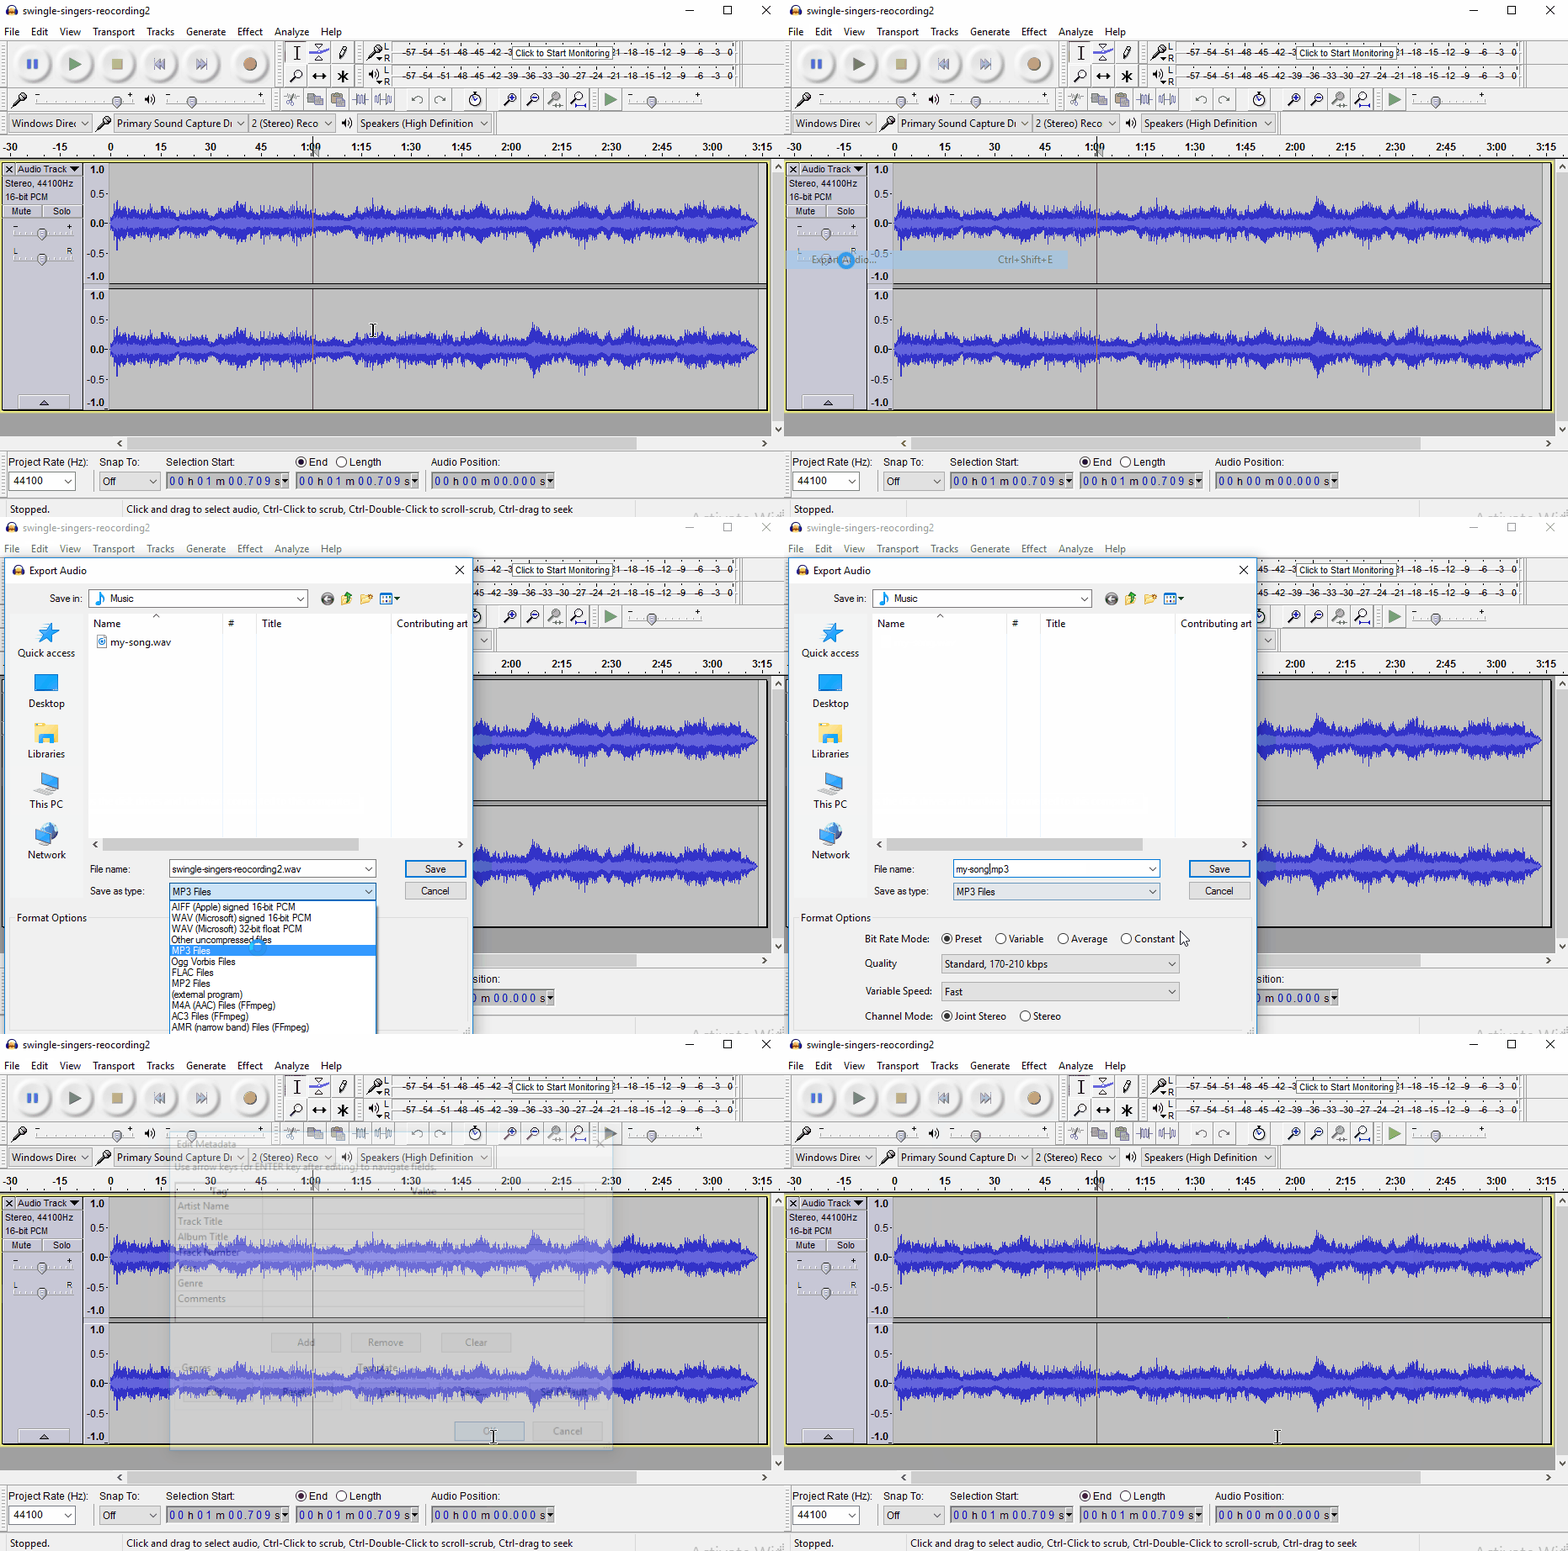
When exporting a song you are going to be asked to provide information about the song, like the title and artist. This information is optional but very convenient. In the animation below, I leave the fields blank to make it quick. The process for exporting all three formats is the same, except that you have to select the file format and some parameters depending on the audio file type selected.
- Go to File -> Export Audio
- Select the file type
- Enter the name of the file
- Adjust parameters or leave the default ones
- Click the Save button
- Edit Metadata
- Click OK
The animation shows the MP3 case, but the others are very similar.
After you export your songs, you could either transfer them to your mobile device, import them to your media player or iTunes. You can also burn an audio CD using Windows Media Player or iTunes.
Suggested reading
If you need more information, you can read Audacity’s tutorial Copying tapes, LPs or MiniDiscs to CD.



Leave a Reply